Thursday, April 1, 2010

Cats-for-Clunkers


Shew, just when I thought I'd run out of excuses for avoiding the laundry. Thanks, Fred! Who needs a fancy cat stand when you have major appliances?

Wednesday, March 31, 2010

The Pits

For Silas's last nursing before bedtime, we lie down together. It's most comfortable for me if my arm closest to the bed is bent at the elbow and tucked beneath my head. Lately, while eating, Silas has taken to playing with my armpit stubble. I suppose this should tell me something about my upkeep...but I'm superstitious that it might impact how well he sleeps at night; 9-hour stretches of sleep have been a long time coming.

TMI, you're thinking? Hey, my only promise was no more crafty entries until Friday.

Tuesday, March 30, 2010

Felt Bunny "Tutorial"

It's another Thing I Made day. I promise - no more until Friday when we dye Easter eggs. This entry was originally to include a tutorial, mostly because I think tutorials are cool. I love, love, love the Little Birdie Secrets blogspot and have dreams of somehow sustaining our livelihood by crafting and/or teaching others to craft. Of course, I have limited crafting knowledge and/or ability. And, of course, by "sustaining our livelihood," I mean that Christian continues working his gig in the attic. I suppose what I would really be doing is "supplementing" our livelihood...but that's just a minor detail.

Anyway, since Silas will miss out on a chocolate bunny in his Easter basket this year, I decided to make him one out of felt. I've been following the felt toy craze for a while (what? you didn't realize it was a craze? sheesh, somebody's behind the times), and I wanted to experiment with it. As it turns out, it's kind of difficult to do a tutorial when you really kind of just fumble your way through something. So here is my pseudo-tutorial about how to make something that loosely resembles a chocolate Easter bunny (that is, if you put it on the other side of the room, close one eye and squint with the other). Here we go...

First, search online to find a chocolate Easter bunny that you like. This was mine. I copied and pasted the image into Word so I could increase the size a bit. After you've chosen your bunny template, pin him to a piece of felt, and cut him out. I used brown felt because he's supposed to be chocolate. Repeat with another piece and you have the bunny basics.

Next, cut two circles out of another color of felt for your bunny's eyes. I used light blue; however, in retrospect, most chocolate rabbits have yellow eyes. Interesting, right? Who knew that chocolate bunnies were such lushes! (However, that might explain the copious amounts of little bunnies...) Anyway, cut out two circles. Again, I found a circle template online to use. This was my circle that I pasted into Word and resized to fit my bunny.

So far so good, right? Well, here's where it gets tricky. I'll tell you what I kinda did, but my bunny crafting involved a lot of improvisation. Clearly, this part of my tutorial needs work.

I next used yellow thread knotted around a tiny scrap of blue felt to make two round balls. These became the eyeballs. I sewed them to the center(ish) of my blue felt, securing them with multiple stitches and knots. When they were firmly attached, I then sewed the entire eye combination onto my bunny pieces, again using multiple stitches and knots. I attached just through the center of the eye; however, you could also stitch around the entire eye. You could also use a smaller circle of a different colored felt instead of knotting an eye; this may actually be the smarter way to go. Whatever you decide, make sure you attach the eyes on the opposite sides of the bunny pieces, unlike what I did the first time. D'oh!

After your eyes are attached, sew your bunny halves together. I used a blanket stitch because I'm fascinated by how easy it is and how great it looks in the end. Plus, I figured it would be easier and timelier than figuring out how to use my sewing machine. Whatever you decide, stitch around your bunny but leave an opening for his guts.

Before you close off your bunny, stuff him. I used a combination of Poly-Fil AND an upcycled wipe refill plastic. Since my little guy is obsessed with crinkly noises, the plastic rustles every time the bunny is squeezed. Not only did it turn out to be a great touch, it was a great use of the plastic waste, too.

Once your bunny is stuffed, complete his stitching. Knot securely and he's good to go. I also sewed a yellow ribbon around his neck for some additional chocolate-rabbit likeness as well as some texture variety for Silas.

I'm pretty proud of the end result. I may have been so proud, I may have even cheated a bit and given Silas a preview. The first thing he did was chew the bunny's ears. Since my goal was a chocolate Easter bunny, I count this as a sign of success.

Monday, March 29, 2010

Wife Beader

I hate to do a series of "I made..." posts, but I'm going to anyway. The truth is, I like making things, and I've been busy making things, so I'm going to tell you about said things. And if you see something I can make that you want to buy for oh, say, something in the realm of my year's teaching salary, please contact me. USPS First Class shipping is free!

A few months ago, after a visit to the Carnegie Museum of Natural History's minerals and gems exhibit, Christian decided I should craft jewelry. This was an odd move on his part since his role is usually The Squasher of My Moneymaking Whims. So Christian spent a small fortune on eBay buying the (his word) "coolest" minerals he had seen on exhibit, handed them over to me, and told me to make jewelry. Right now, they're in the bottom drawer of the secretary desk in my dining room, still in their original eBay packaging. BUT NOT FOR LONG!!!

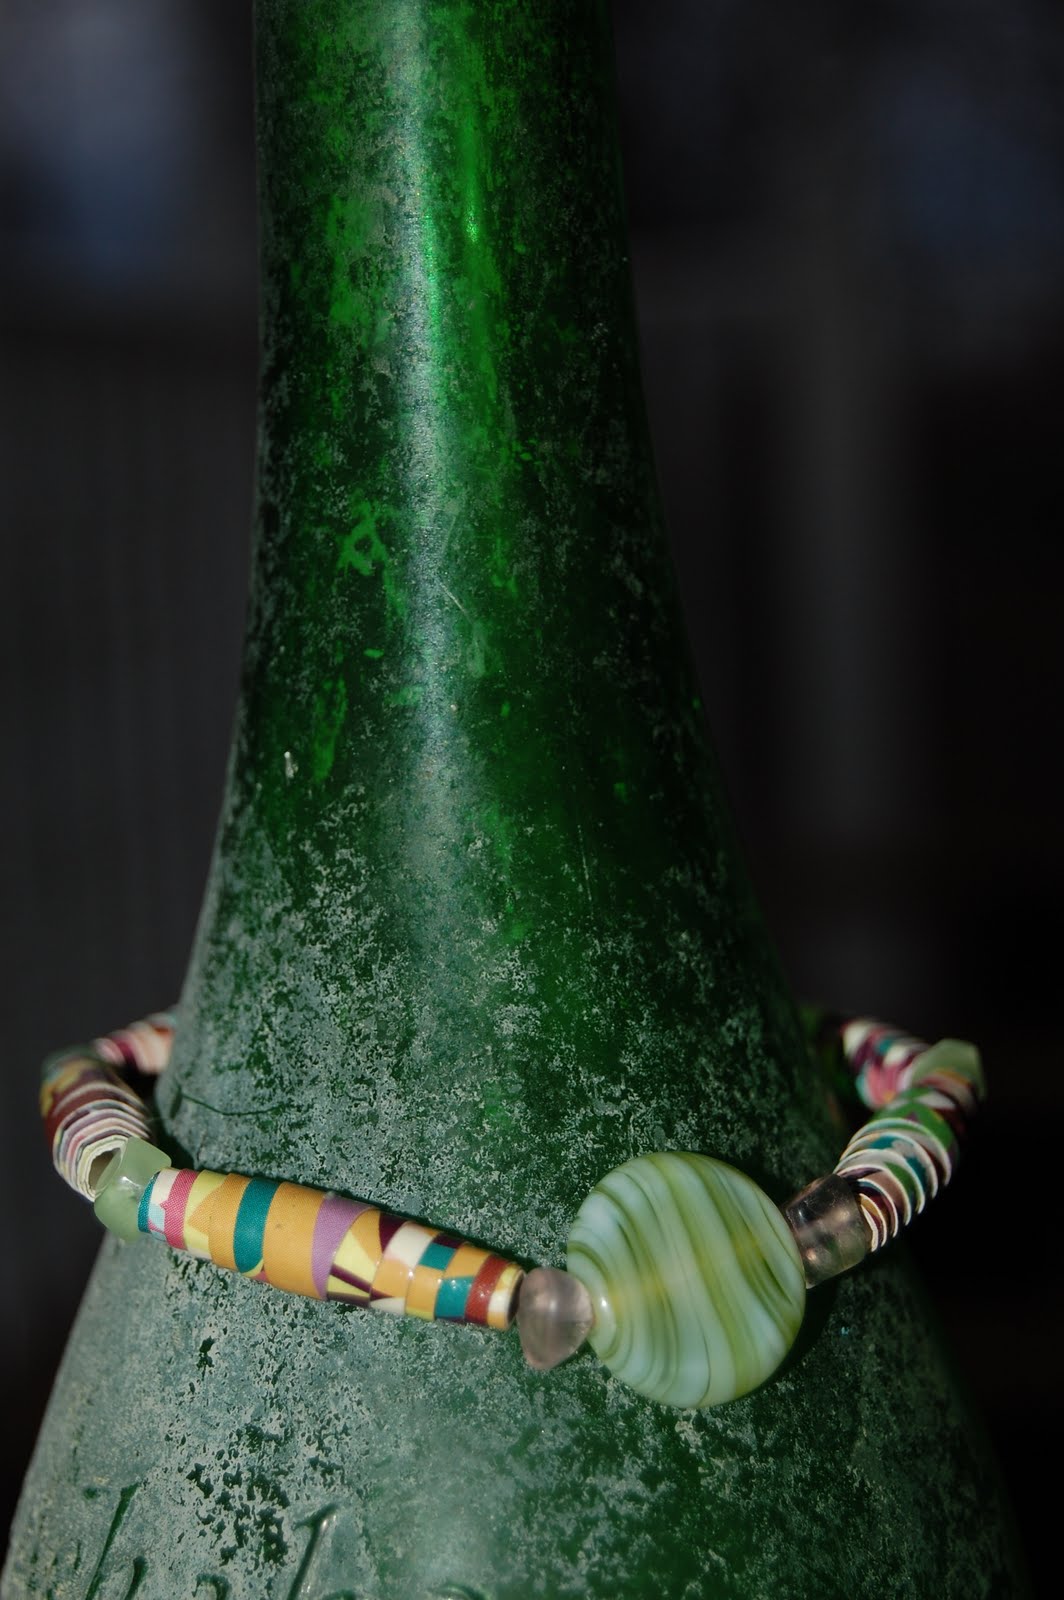
My mom and I signed up for a jewelry making class, and our first session was tonight. The instructor is super petite and super enthusiastic, and she makes me, my mom, and the three old ladies in the class feel like we're already super jewelers. And I learned how to make paper beads! That's right...beads from paper! Ahhhh. Please bask in the beauty of my handiwork. And yes, I do have a PayPal account for easy and secure transactions. Those cool minerals just might find their way out of that drawer sometime soon...

Sunday, March 28, 2010

The Secret Ingredient

I made lava!

I wasn't really trying to, it just kinda happened. What I was TRYING to make was Crunch Bars from my food&family. It's a best-loved recipe. It takes 30 minutes. It can't be bad, right?

Huh.

What they neglect to include in the 2-paragraph directions on page 30 is that butter and brown sugar, when left on the stove for (*maybe*) a little too long, combine to create a deadly force that can fill your kitchen/living room/dining room/foyer with the hideous stench of something akin to how I imagine a combination of burning toenails and cat urine would smell.

This is what happens when I attempted the 5-starred recipe:


I know it looks kind of like a moist chocolate brownie in that pot...but believe me...it wasn't. The apparent chocolatey-brownie-goodness was really a bubbling, scalding, smoking, frothing monster that I rushed from the stove and slammed down on our front porch because all 8 of our smoke alarms were already blaring.

"Do you think the neighbors think you're a witch?" Christian asked.
"Um. For which reason?"
"Because there's a cauldron on our front porch."

Since I still needed a dessert for the jewelry party, I started again. This time, I had moderate success. The crunch bars looked remotely like the picture in the magazine, but all I could taste was burnt toenails seasoned with a hint of cat urine.

I took them to the party anyway.

"You're such a little Suzy homemaker!" my friend Bridget exclaimed as she took a bite.
"Well, I'm just good in the kitchen," I responded. "It just comes naturally."

Thursday, March 25, 2010

Wingin' It

I finally stumbled upon a good wing recipe. Since Christian doesn't like hot wings, and I don't like my wings floating in a pool of butter, it's tough to find something we'll both enjoy. These wings are ooey and gooey, perfectly caramelized and tender. Be warned that they are sweet (both figuratively AND metaphorically, of course). Credit belongs to allrecipes for supplying me with a recipe that included only 3 ingredients (in addition to the wings) and was simple enough for my domestically-challenged self:

Candied Garlic Chicken Wings

Ingredients:
1 1/2 cups honey
6 tablespoons soy sauce
2 cloves garlic, minced
2 pounds chicken wings

Directions:
1. Heat honey, soy sauce, and garlic in saucepan until boiling.
2. Place the wings in a 9x13" baking pan and pour the honey mixture over the chicken. Cover with foil. Marinate in the refrigerator for a few hours or overnight.
3. Bake, covered, at 375 degrees F for 1 hour; turn the wings after 1/2 an hour.
4. Remove the foil and bake 15 minutes longer.
5. Take the wings out of the sauce and bake on a pan for 10 minutes.
6. Turn the chicken wings and bake for 10 more minutes.

Put a Sling On 'Em

As a dedicated babywearer, I hope yesterday's Infantino sling recall isn't bad for the babywearing business. Having a baby that some sweet, sweet people would delicately term "high needs" (cough, cough), my Pikkolo has given me the freedom and confidence to once again leave the house. With it, I can even accomplish menial tasks; I can actually grocery shop without major baby meltdowns and other shoppers glaring at me in a way that suggests they suspect I beat Silas with a value pack of chicken breasts to make him scream like that. Babywearing, when done properly, has great benefits with no back pain or risk of suffocation. Though I never mastered sling wear, this video cracks me up. It's a bit out there, but it's nice to see that I'm not the only one who wears my baby along with Spandex and stilettos. Yeah, sorry for that visual. :)